Bread #31 Mallorcas

I was not familiar at all with this particular bread, but it definitely appealed to me when I read the recipe.  It is an enriched bread dough, with eggs, butter, and sugar, and it comes from Puerto Rico where is is eaten as a sweet bun with powdered sugar on it.  I ended up not using the powdered sugar, but I can tell you, this recipe is a total winner, and I can’t wait to show you how I made it.

IMG_2569

The ingredients include AP flour, yeast, salt, whole milk, eggs, sugar, and a ton of butter. I did the usual combining of the wet and dry ingredients, holding off on the softened butter.

By the way, here’s a tip.  If you need softened butter at room temperature, and you forgot to set it out in advance (like I did), try this:  Put the butter in the microwave at 50% power for 10 seconds.  See how it is.  Do another 10 seconds at 50%.  It should be soft without having melted.  Try it.

IMG_2570

The dough took a while to really get cohesive, but it eventually did and pulled from the sides of the bowl.  Next, you have to start adding the softened butter to the dough as it kneads.  This part always gives me trouble, usually the dough just becomes a mess and won’t knead, and it is just so difficult to do.  With this recipe, though, adding the butter bit by bit worked great, and I wasn’t even tempted to add flour or anything.  I let the mixer do its thing and the butter got incorporated really well.

IMG_2571

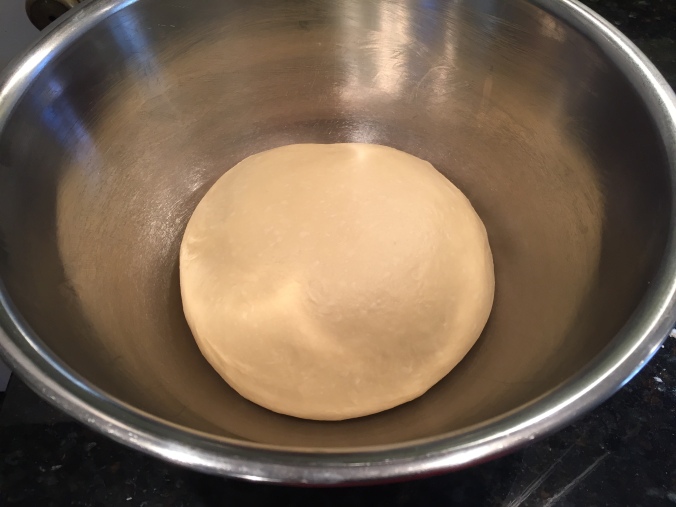
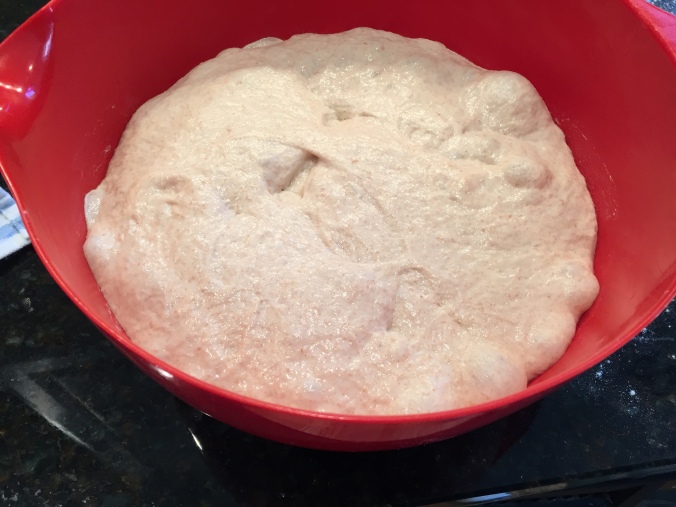
This was a large amount of flour – 5 cups – so I set the dough to rise in a large bowl, and it said to let it rise for 2 hours, which I did.  After two hours…

IMG_2573

It rose great!  It takes up the entire bowl.  Also, the dough was soft and cool, and really easy to work with.

I cut the dough into 2 pieces, and worked with one piece at a time.  I rolled it out, spread melted butter on it, and then rolled it into a tube.  I should have rolled it tighter than I did, so my advice here is to roll it tight.

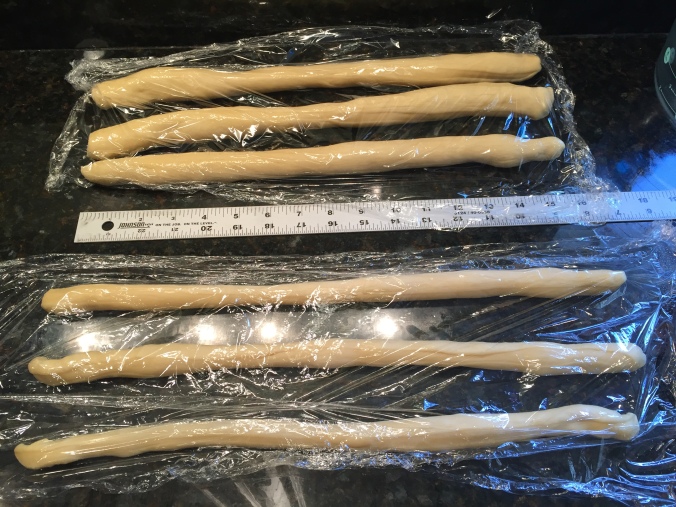
The next step was you cut the dough into 6 pieces, roll each piece into a longer tube and roll it up into a spiral roll.  This was easier said than done.  The smaller pieces of dough did not want to roll out.  Thinking about it now, I think the gluten was not relaxed. I needed to let them rest at this point, but I didn’t do that.  So my advice here next is to let them rest before you re-roll each bun.

IMG_2576

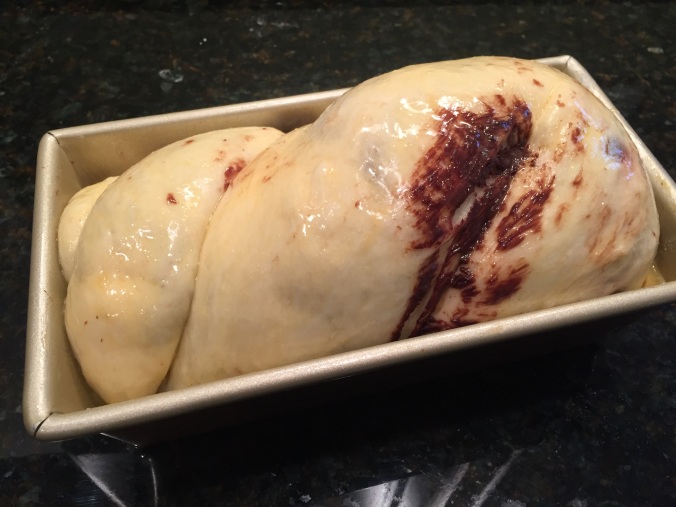
Here are my rolls set out for the second rise.  They look ok, but not perfect by any means. I tore a lot of them by forcing them to roll out.  Again, I should’ve given them time for the gluten to relax.  I let them rise again for 2 hours, so they would double in size.

IMG_2577

After the second rise, they got really huge again and they were ready for the oven.

IMG_2580

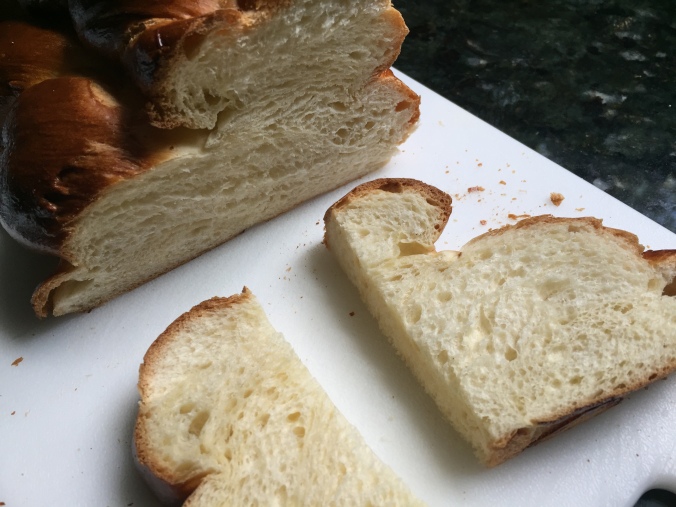
They baked up great and smelled wonderful.  They are meant to be eaten as a dessert I think, but I ended up eating them with dinner and sliced as a sandwich.  They were delicious!  Excellent.  This is just the way I love bread.  Rich and slightly sweet.  Seriously these were delicious.  I also ate these toasted and with some nutella on them, and let me tell you, that was also like heaven.

IMG_2581

This is an amazing recipe that I highly recommend.  I give it another enthusiastic 5 out of 5 stars.  If you ever are in a Puerto Rican bakery and you see these buns with powered sugar, make sure you try one.  Thanks for reading and I’ll keep on baking.

Bread #30 Kaiser Rolls (plus a Mary Berry recipe)

This week I made Kaiser Rolls, a recipe that at first I was not very excited about making. This recipe was the next “regular” bread recipe in the book, which I had skipped over a few weeks ago.  I went back to it, and I am glad I did, because I ended up really enjoying making and eating these rolls.

IMG_2550

The recipe calls for a LOT of flour — 5 cups.  I think this is a largest recipe I have made to date.  Along with the flour was yeast, salt, water, vegetable oil, an egg, and sugar.  This dough came together quite easily, and it was also quite easy to knead.  I set it out to rise for an hour and half.  When I got back to the dough, I realized I had seriously let it over-rise.

I just went on with the recipe and stretched the dough out to a rectangle, and then I cut the dough into twelve strips.

Shaping the rolls was kind of fun, but I didn’t quite get it 100% accurate on all the rolls. What you do is you take a piece of dough, tie it into a knot, and then with the loose ends, you fold one end over into the middle and the other under into the middle, pinching the ends together.

See how it forms the Kaiser Roll shape?  Just like that, that is the secret to forming a Kaiser Roll.  I did all the other pieces of dough, and set them to rise.

IMG_2561

They rose up really nice, and I glazed them and sprinkled them with poppy seeds, to give that authentic Kaiser Roll garnish.

These baked for 30 minutes, and they came out looking golden brown and looking like actual Kaiser rolls.

IMG_2565

I ate one after they cooled as a sandwich, and it tasted great, and it really had the Kaiser Roll flavor.  This is a really great recipe, and I will totally make these again.  I think they be great with hamburgers at a cook-out.  I rate this recipe 5 stars out of 5.  It’s a great recipe and even with over-risen dough, the final product came out excellent.

IMG_2566

And lastly, I want to share another recipe that I made.  You may be aware of a celebrity baker named Mary Berry from “The Great British Baking Show”.  I have been watching that show, and I was inspired to make Mary’s recipe for cherry cake.  I thought I’d share it with you here.

IMG_2548

It turned out picture-perfect, and tasted nice, although I over-baked it a little.  My bundt pan is larger than what the recipe called for.  But at any rate, it was a nice recipe, and I very much tried to do Mary proud with my execution of her cherry cake.  Hope you liked it too.  Thanks and I will keep on baking.

IMG_2549

Bread #29 Chocolate Babka

I remember first learning about Chocolate Babka by watching Seinfeld:

I didn’t know what a Chocolate Babka was then, but after seeing the recipe for it in this book, I have wanted to make this recipe for months.  I finally got to it this week, and although it did not turned out perfectly, it is a great recipe I am excited to share here.

IMG_1304

The ingredients include AP flour, milk, salt, yeast, sugar, egg yolks, and softened butter. Getting this dough together was difficult and I had to be creative to get it to the proper amount of kneading.  First off, there are only two cups of flour in this recipe, and this small amount made it hard for the dough to engage on the dough hook of the mixer. The dough also requires that you add the softened butter into it bit by bit, and this too was very challenging.

Here are some tips if you are making this recipe.  Combining the wet ingredients with the dry (before the butter) was straight-forward.  But once you start adding the butter, the machine couldn’t handle it.  I ended up doing this by hand, using a spatula and folding the dough over the butter repeatedly until it absorbed.  This was hard work actually, and you might say it was good exercise.

After all the butter was incorporated I put the bowl back on the mixer.  The dough hook did not fully engage with the dough.  I let it run, and then I would scrape down the bowl and gather the dough around the hook.  I would let it run some more, and then scrape again.  After several times of this, the dough finally got onto the dough hook and began to knead on the machine like normal.  I’m glad I stuck with this technique because it worked eventually.  I let the dough knead for about 10-12 minutes.

After the kneading, the dough was very soft, and cool.  It had a very different feel from other bread doughs that I have made. Just soft and billowy.  I set it to rise for 2 hours, and then you have to refrigerate it for at least an hour.

I was ready to do the rolling and the assembly in the late afternoon after doing the dough in the morning.  I made the chocolate mixture, which included unsweetened chocolate, butter, cocoa powder, and an egg white.  When I added the egg white at the end, the mixture became very loose — slack.  I spread the chocolate mixture on the rolled out dough, and it was very thin.  I think next time, I won’t use an entire egg white, to keep the chocolate mixture a little more thick.

IMG_1315

Next you roll up the dough on the long end to form a tube, pinching the seams.  Then you spread the rest of the chocolate mixture on the seam.

The last part of the forming is tricky.  You have to fold the dough over itself in half, and then give it a twist before putting it into the loaf pan.  I did an okay job with this, but my loaf was a little lop-sided.

IMG_1318

I set the dough to rise again, and luckily with the rising time, the dough distributed itself into the pan.  I may have over-risen the dough at this point.  Next time I might not let it raise as much.

IMG_1319The last step was to bake it.  It took a while at a lower oven, 350 degrees for 45 minutes.

IMG_1320

The babka baked up beautifully.  It did stick to the pan though, and I had a bit of difficulty unmolding it.  Next time, I need to really grease the loaf pan thoroughly and lavishly.

IMG_1322

I sliced into the bread, and the swirls of chocolate were not what I was hoping for, but the patterns still looked good.  The true test was the taste.  This bread was delicious! Chocolate, butter, rich bread.  It was just an awesome bread.  Perfect for a breakfast pastry, or an evening snack.  Even with the many minor mistakes I made with this bread, I give it an enthusiastic five out of five stars.  I definitely want to make this again.  I imagine you could have fun with the fillings, from chocolate, to cinnamon, to whatever strikes your fancy.

I hope you liked this week’s bread.  See you next time with the next bread.  You know me, I will keep on baking.

IMG_1321

Bread #28 Challah

One of my all-time favorite breads is Challah.  I have been excited to try this particular recipe for many months, and I have skipped ahead in the book to make this bread this week.  This recipe is located in the 5th chapter of the book.  This chapter is called “The Sweeter Side”, and although Challah is a sweeter bread than say, white sandwich bread, I don’t consider it sweet like a cinnamon roll.  I guess they needed a place to put this recipe, so they put it in the the sweeter side, but it isn’t the best place to put the recipe in my opinion.

IMG_2506

Here are the ingredients: AP flour, yeast, salt, water, vegetable oil, eggs, and sugar.  I neglected to measure out the sugar for the picture above, but there is a 1/4 cup of sugar in the recipe.  Also, you’ll notice that the liquid is all water, not milk.  Also, the fat is coming from the vegetable oil, and not butter.

The dough came together really nicely, and kneaded well on the mixer.  I let it rise, and it doubled in size in about an hour, although the directions said to give it 1 1/2 – 2 hours.  It didn’t need the 2 hours, as you can see in the picture.  An hour was fine, but it was a warm day I guess.

After the rise, you have to divide the dough in 2 pieces, but one of the pieces is 1/3 of the dough, and the other is 2/3 of the dough.  To each of these pieces, you divide evenly into 3 pieces.

IMG_2512

Next you roll out the dough into 16 inch ropes.  The dough was very easy to roll, very relaxed.  It did not spring back — easy to work with for sure.

IMG_2515

The next step was to braid the dough so you had a big braid, and a skinnier braid. Braiding the dough was very easy to do too.

IMG_2516

The next step was to place the large braid on the baking tray, glaze it with egg glaze, and then place the skinnier braid on top.  I glazed the top too, and left it to rise for an hour.

IMG_2517

After an hour of rising, the dough really puffed up nicely.  I did another glaze of egg wash, and put it into the oven for baking.

IMG_2518

As you can see the bread came out of the oven looking amazing!  A beautiful color and a delicious aroma.  Also, it continued to puff up and grow, and compared to the original braids I made, the end product was so much bigger.  The ends of the bread came undone during the baking however.  I did not tuck them in well enough.  I will do better at that next time.  But overall, the bread turned out great.  I let it cool before I tasted it.

IMG_2519

The bread has a tight crumb, a pleasant taste, and a light and airy quality to it.  It was delicious to eat, and I loved it.  It is a perfect Challah bread recipe, and I will certainly make it again.  I enthusiastically give this bread five out of five stars.

IMG_2520

That’s the bread for the week.  I hope you are having a good day, and if not, maybe tomorrow will be better for you.  I hope so.  Ok, peace out, and I will keep on baking.

Bread #27 Crescent Rolls (plus a bonus)

I’ve gotten into the spirit of bread-baking in the last few weeks, and so with that inspiration I bring you another blog post instead of waiting another month.  This week I went back to the chronological order of the book, and the next recipe in the book was for crescent rolls.

These are rich, buttery, and real-tasting crescent rolls.  They are not croissants, but crescent rolls, not unlike the kind you get in the tubes in the refrigerator section of the supermarket.  But unlike those types of crescent rolls, these ones tasted like actual real bread made with ingredients that are actually of this earth.

IMG_2375

The ingredients are rich rich… along with the all-purpose flour, yeast and salt are: Half-and-half (rich!), butter (rich rich!), sugar, an egg, and an egg yolk.  Yes, this dough rich.

The dough came together easily, and kneading it was no trouble at all, but it did not get as stretchy as other doughs, possibly due to the high amount of fat in it, I don’t know.  I let it rise for an hour and a half, and it did not grow that excessively, although it did double.

The next thing you do is to roll out the dough into a 12-inch circle, and cut it into 12 wedges.  You take each wedge and starting at the larger end, you roll up the dough into the crescent roll shape.  As I made these, my rolls got tighter and tighter, so there is an art to the rolling of the dough.  I think the tighter you roll, the better.  The rolls that I did not roll tightly ended up separating later on.  I would recommend rolling them up tightly.

I placed the rolls on a sheet tray and let them rise.  They puffed up a little but didn’t necessarily get that much bigger.  You can kind of see here how the ones I didn’t stretch and roll tightly were already starting to come apart and unravel a little.

IMG_2383

I glazed the rolls with an egg wash, and baked them.  They came out looking golden brown and baked up perfectly.  I let them cool slightly, but these are meant to be eaten when they are still warm, and this is when they are at their optimal best.

IMG_2386

They tasted great, excellent.  I had them plain and they were doughy and buttery.  Dense, but in a good way.  I also had one with breakfast, toasted with jam.  Great!  And lastly I had one with some nutella, and that was also amazing.  I bet if I put nutella on the raw dough, and rolled them up and baked them, they would make a nice sweet roll.  I’ll have to remember that for the future!  I give these rolls 5 stars.  They were easy to make, turned out great, tasted great, and I think they’d be great with a nice meal.

BONUS content!  Pain de Campagne – second try

Ok, I had to take another stab at making the pain de campagne that I thoroughly screwed up last time.  I followed the recipe again with a few exceptions:

  • I added about 2 additional tablespoons of flour during the initial kneading process
  • I skimped on the rising time since I was under some time constraints
  • I thoroughly floured the banneton cloth, excessively
  • I used a linen banneton cloth, rather then the cotton dish towel.

Here is the dough right before I put it in the oven to baked.  It retained it’s shape and structure, and I was able to slash it as is required.

IMG_2391

It baked up well and looked like an artisan loaf with all that flour on the outside.  To be honest, it was a little too much flour on the outside that I used, but I definitely was trying not to get it to stick this time.  It did not stick, but also, so much flour!  It looks good in the picture, but in real life, it was a lot of flour on the outside.  Next time I need to moderate the flour on the outside and not overdo it.

IMG_2396

Hooray, I got the irregular holes in the crumb of the bread!  That’s what I was hoping for. I still do want to try doing this bread again, though, since I did skimp on the rising time, due to some time constraints I was working under.  This is definitely a bread where you have to just be at your house all day long.  You just have to not have any other plans that day, other than maybe doing housework.  This bread has some hands-on work, but for the most part a lot of the time is taken up by letting the bread rise.  So the next time I do this, I just have to set aside the time and do it.  It is a good way to get your house clean, I guess, doing housework as you wait for the bread to rise.

I guess that’s why bread-making at home is only done by baking-hobbyists like me — it takes up so much darn time!  But wood-working and other “slow” hobbies are similar I guess, right?

IMG_2397

Thanks as always for reading this double-dose of the bread blog.  Hope you all can have an enjoyable day, but if not today, maybe tomorrow will be better for you.  There’s always tomorrow for dreams to come true.  As always, I will keep on baking.

Bread #26 Pain de Campagne (plus a bonus!)

I know.  It has been a while since I have posted a blog about my latest bread.  For those of you who know me, you know the reason why I have not been actively posting.  I still have been doing a lot of baking, of course, but I have not been blogging about it. Whelp, I am back with my next bread.

For the last month, I have been obsessed with making bread with those large, irregular holes in it.  Hopefully you know that type of bread – it has a crust, the outside of the bread is crunchy and crusty, and the inside has an irregular crumb.  This type of bread, for some reason, is the “holy grail” of bread-making.  I have been obsessed with making this type of bread lately, and I have been trying very hard for the last month to master it.

I have been mostly unsuccessful in my attempts.  I have definitely not mastered this type of bread yet.  The bread I make is good, but it has a tight crumb, like normal bread.  I have been trying to figure out how to do this artisanal for weeks!

Which brings me to the bread I tried this week.  The bread is Pain de Campagne, and it is a recipe from the book, but I skipped ahead!  This is my first recipe that I did out of sequence!  I hope this fact does not scandalize you.

IMG_2351This recipe requires a “sponge”, which is bread flour, water, and a small amount of yeast. You mix these until combined, and then you let it sit on the counter over night.  This builds up flavor molecules in the sponge which will give the final bread more depth — or so they say.  Who are they, you ask?  Them.  The bread makers.

IMG_2353

I made the sponge and the next day, it looked like this – doubled in size and bubbly.  I prepared the other ingredients for the rest of the bread: bread flour, whole wheat flour, yeast, water, and salt.

IMG_2354

I’ve learned in making these types of artisanal breads, the water content is very high compared to the flour.  This is known as the “hydration level”, in bread-making-speak, so these types of breads have a high hydration level. This has been the biggest challenge for me, figuring out how to work with the bread when it is so wet and sticky!

I mixed the sponge with the rest of the ingredients, and the dough never really formed in the mixer.  It was more like a batter.  I resisted the urge to add more flour, because I know the high hydration is required to give those irregular holes that I so desire.  I followed the recipe to the letter, placing my trust in the recipe.

IMG_2357

I allowed the dough (batter?) to rise, and it did double in size easily.  The next step was to place the dough into a prepared colander with a lining of a towel.  This is known as a proofing basket, or banneton.  I allowed the dough to rise in my make-shift banneton.

After the dough had risen the directions said to turn out the dough onto a sheet of parchment paper.  Unfortunately, this is where the rubber-met-the-road with the wet dough.  The dough was so wet that it stuck to the towel liner even though I had thoroughly floured the towel as the recipe directed.

The dough was so wet, and the structure was so weak, and it would not release from the towel.  So I pulled the towel off the dough, destroying any kind of structure it might have had.  I really had no other choice.  Also — it was only a combination of flour, water, yeast, and salt so this wasn’t a life-and-death decision.   I just went ahead and baked it.

0IMG_2367

I baked it on a pizza stone in the oven.  I also added pie pans of lava rocks in the bottom of the oven and poured boiling water on top of them in order to create the steam in the oven which is required to form the desirable outer crust.

IMG_2368 
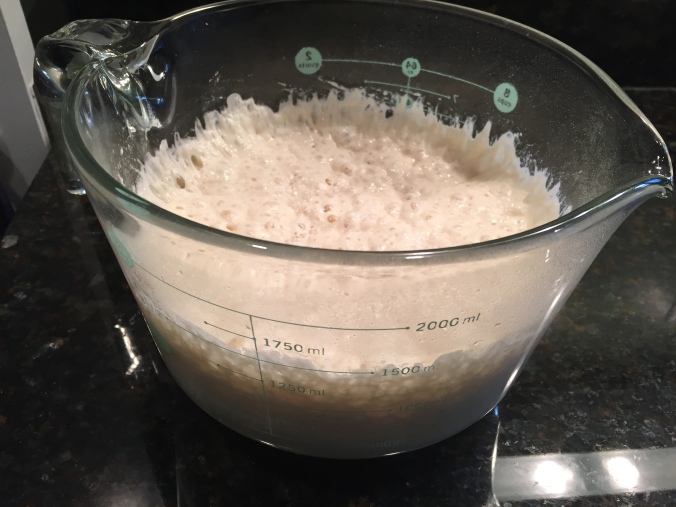
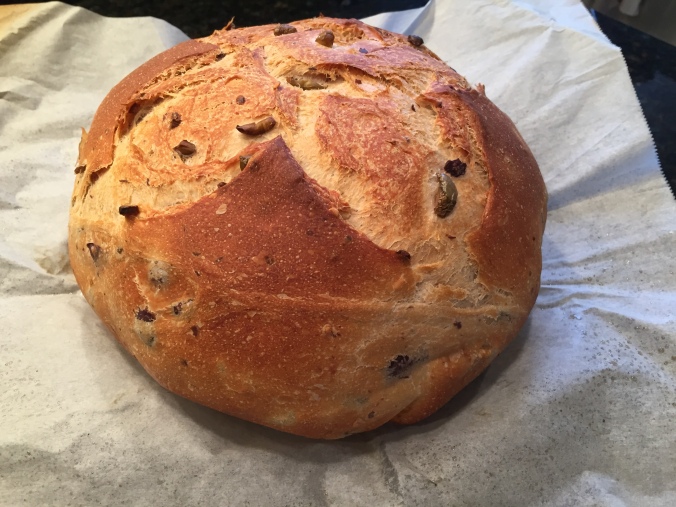
As you can see from the finished loaf — it is flat, and does not have the necessary outer “gluten-cloak” which is really needed for the structure of the bread.  I broke the gluten cloak when I ripped the dough free from the towel.  So it basically turned out looking like a huge pita bread.

IMG_2370

When I sliced the loaf, I did get my irregular holes, but the bread is supposed to be twice the height.  It tasted fine.  It was still a decent loaf even though it was not what I was hoping for.

I want to try this recipe again, but I will add a few tablespoons additional flour at the beginning when the dough is being kneaded on the dough hook.  I think this would’ve allowed the structure to form.

I learned a lot with this particular loaf, even though it did not work out the way the recipe said it would.  But I will try it again.  This is definitely an advanced recipe.  I am giving this recipe 3 stars out of 5, due to its difficulty and lack of direction on the addition of more flour.

And finally before I take my leave of you, I also made a cake that I wanted to share with you:

IMG_2365

This is a triple layer white cake, with a home-made blueberry jam between the layers. The frosting is a cream cheese buttercream that is flavored with the blueberry jam.  You take the frosting and divide it into three portions.  Each portion has a different amount of jam in it, and I frosted the cake with the darkest at the bottom, medium in the middle, and lightest on top.  This creates a nice ombre effect.  Kinda cool, eh?  I liked this cake a lot and I give it 5 out of 5 stars.  I was very inspired by this cake, so I if I make any more cakes, I’ll show them here.

IMG_2364

Ok, thanks for reading!  Hope everyone has a great week!  Enjoy, and I will keep on baking.

Bread #25 Parker House Rolls

I have been absent from the blog for a few weeks, so I want to acknowledge that up front here in this blog post.  It was due to a combination of factors.  I was away in Las Vegas for a vacation, and also this is a busy time for me at work — the month of May is a long month for the work I do. But I am back with the latest recipe — Parker House Rolls.

I have seen this recipe in other books before, and I’ve been meaning to make this for a while, so I was looking forward to trying this recipe out.

IMG_2277

The ingredients are all the things I like in bread or rolls: flour, yeast, salt, whole milk, butter (a lot!), an egg, and sugar.  I combined them in the usual way, dry; wet; combine; knead for 8 minutes.

IMG_2278

I made a mistake, though, with getting the ingredients together.  The ingredient list said 14 tablespoons of butter, melted.  So I melted the 14 tablespoons.  But then, the recipe said to add only 8 tablespoons to the dough!  I should’ve read the recipe more carefully. But wait, listen to how I solved this problem you guys.  I took my kitchen scale and set it to grams.  I poured the melted butter into a bowl on the scale and measured the 14 tablespoons in grams.  I divided that by 14, then multiplied by 8.  In a new bowl I measured out the 8 tablespoons of butter in grams.  I was glad I did this, rather than wasting the butter.

The dough came together really great.  After the kneading, it was just a really nice-feeling dough, really nice.

IMG_2279

I let the dough rise, and the recipe said 1 – 1 1/2 hours for rising.  Well, the picture shows that my dough really rose — this was after 1 hour.  So I am thinking I might’ve “over-proofed” the dough, but oh well.  It was more than double.

To shape the rolls you divide the dough in two, and then each half you cut into 12 pieces.

IMG_2283

Then you take each piece of dough, and form into a ball.  This was kind of a process, and took a while to do this.

Then you take the dough ball and flatten it.  Using a wooden spoon, you create an indent in the dough and then brush with melted butter.  You fold the dough together to form the Parker House roll.

IMG_2286

I thought I did it right, forming the rolls.  I let them rise for an hour.

After this rise, the rolls puff up.  You can see that they have remained in the folded-over status.  I thought they looked good.  So I put then in the oven.  This is when the devastation began (which I say with absolutely no hyperbole).

IMG_2291

When the baking was done, as you can plainly see, the rolls popped open during the baking!  Boo hoo!  Well, all but one opened up.  So I had one perfect roll out of 24.  Not a good average at all.  Again, boo hoo!!!

IMG_2292

But oh well, I let the rolls cool.  I tried one, and they tasted fine.  Just a roll.  Nothing to knock your socks off.  But very nice.  A day later I took some of the rolls and toasted them and ate them with nutella, and they were really good that way.  Toasting these make them more buttery I think.

Anyway, I have to say that this recipe, so far in this project, is the first to be a “failure”. I put the “failure” in quotes because the rolls were decent and edible in the end, but they weren’t supposed to pop open like that.  So I will rate this recipe at a 3 out of 5 stars, and my execution of the recipe at 2 out of 5 stars.  If I try this again, I will make the indent with the wooden spoon harder, and I will smoosh the dough more than I did when I folded the rolls over.  And I will not let the dough over-proof.

Thanks for reading, and again sorry for the little break that I took with the blog. Have a great day, and I’ll keep on baking!

Bread #24 Honey-Wheat Dinner Rolls

I decided to soldier on and just do the next recipe in the book, which was Honey-Wheat Dinner Rolls.  And I am very glad that I did because I loved these dinner rolls.  When I looked at the ingredients I was pretty sure I would like this recipe.

IMG_2240

The ingredients included whole wheat flour, all-purpose flour, yeast, salt, whole milk, honey, butter, and egg.  It was a rich dough with the butter and egg, and good quantity of honey for sweetness.  And I tend to really like breads made with milk rather than water.

Mixing this dough was more challenging than other doughs that I have tried.  The dry ingredients mixed with the wet easy enough, but in the mixer, the dough was very wet and sticky, and never really became a ball that kneaded.  I added 2 extra tablespoons of flour to try to get it into a dough that the dough hook could knead, but it didn’t happen.  I didn’t overdo it with adding extra flour, and just did some hand kneading at the end.

The dough was soft and sticky, and after an hour and half it had doubled nicely.  The next step was to cut the dough into 15 pieces.

IMG_2243

I took each piece and formed tight balls, and put them into the prepared baking dish which I lined with a greased aluminum foil sling.

IMG_2244

I allowed the dough to rise and they really rose nicely.  I might add here that I watched the Great British Bakeoff on Netflix recently, and they say “proof” instead of “rise”.  I let the shaped rolls proof.

IMG_2245

The rolls proofed great and they filled up the entire pan.  I glazed them with an egg glaze, and off they went into the oven.

IMG_2246

The rolls came out of the oven golden-brown, and they smelled wonderful.  I did not try them until the next day, and these rolls were delicious.  They were rich and soft, pillowy, with a nice wheat taste, and a lovely honey sweetness.  I can easily eat many of these rolls at a time.  I also ate the roll in sandwich form, and they make awesome little slider sandwiches.

IMG_2248

I give this recipe FIVE stars, it was a great recipe and made me glad I didn’t skip it for a different recipe.  A wonderful soft wheat dinner roll!  Thanks and see you later.  Keep on baking.

IMG_2250

Bread #23 Rustic Dinner Rolls

I am starting on the third chapter of the book now, which is called “Mastering size and shape: Dinner rolls and more”.  The first recipe is Rustic dinner rolls, which turned out fine, which I will get to, but as I leafed through the upcoming recipes in this chapter… I have to confess that I wish I was getting into the more advanced breads than what this chapter has to offer.  I’m starting to debate skipping ahead to the chapter with the advanced bakes.  I haven’t done it yet, I’m sticking to my original outline of doing all the recipes in order for now.  But the thing is I think I am ready for the challenge of the advanced bread.  I’m tempted to change the rules of my project. We’ll see.

IMG_0778

Ok, so on to this bake.  The ingredients are basic.  Bread flour, a little whole wheat flour for extra taste, yeast, water, honey, and salt.  This is a basic bread dough, although the recipe did specify that after combining the ingredients, you let the dough rest in the bowl of the mixer for 30 minutes WITHOUT the salt.  The salt is supposed to be put in after that rest period. Except — I messed that part up, and I put the salt in with the flour. Oops. As I like to say, “What is done, is done.” So I just kept on with the recipe, and did the kneading, and then let the dough rise.

The dough did rise really nicely, and the recipe called for continual partial kneading in 30 minute intervals. This is very much like a beginner dough recipe, a beginner dinner roll recipe.

The shaping of the rolls was also very basic, very easy.  After stretching the dough into a log shape, you cut the dough in half, and then each half into 8 equal pieces.  I arranged the pieces cut side up in greased cake pans.

IMG_0787

After letting the rolls rise, I misted them with water from a spray bottle, and they went into the oven.

IMG_0788

Halfway through the baking, I took them out of the oven, separated the rolls and put them on a baking sheet.  The final baking of the rolls was like this, separated.

IMG_0790

The rolls came out looking nice, and rustic.  I mean, there was no effort at all to give these rolls any shape.

At first, after cooling, the rolls had a nice crust to them, like a dinner roll, and they had a good taste.  The taste was fine, basic.  Nothing too special really.  I put the rolls into a plastic bag, and ate a few several hours later, and by that time the crust had softened from being in the bag.  I actually liked them much better that way than with the hard crust.

These were good rolls, easy to make, and difficulty-wise they were just really easy, and nothing that I stressed out about.  Definitely a beginner dinner roll.  I will give these rolls and this recipe a solid three stars out of five.  Just because the rolls were so basic.  And like I said at the beginning, I am getting anxious to try the more advanced recipes — but that would mean skipping ahead.  Stay tuned to see what happens in this baking project. Have a good week and I’ll keep on baking.

IMG_0791

Bread #22 Spicy Olive Bread

I approached making this bread with trepidation, dread, and also a sense of accomplishment. The accomplishment came from the fact that with this recipe, I have finished the second chapter of the book.  The trepidation with this recipe came from the fact that I had to buy olives for this recipe, and I wasn’t really sure what kind to get.  The dread for this recipe came from my dislike of olives.  In fact, I hate the taste of olives.  I like olive oil, though.  But olives are just not my thing.  Under normal circumstances, I would never have even tried this recipe.  But with this project I succeeded in making this bread, and facing my culinary fears.

IMG_2213

The ingredients included chopped up olives (I used green olives and kalamata olives), garlic, bread flour, salt, red pepper flakes, water, sugar, and olive oil.  Very much so, this bread is an Italian-style bread with the water and the olive oil.  I’ve done this type pf bread before, so I knew what was coming.

IMG_2214

The dough came together in the usual way as I have covered before in other breads, but the major difference in putting this dough together was the addition of the chopped olives combined with the garlic.  Also a little different was adding the hot pepper flakes to the flour.  I tried adding the olives and garlic mixture using the machine, but the dough hook just formed a groove in the oily dough and the dough didn’t turn over.

So I kneaded in the olives and garlic by hand.  At first things were very slimy and olives were everywhere on the counter.  But as I have learned when you are working with a nice dough that you then add more things to (like butter, or olives, or other fillings), the dough separates and gets oily and you think that you’ve ruined it.  But if you keep working it, the dough comes back together, and it again wants to be homogeneous.  I successfully added the olive mixture and set it to rise.

IMG_2216

The dough rose great, and I flattened it out and then brought up the sides to form a ball. I placed the dough in a parchment sling and lowered that into a dutch oven.  The dough rose again.  Then I slashed it, and baked the bread with the cover on the dutch oven for 30 minutes.  I used this technique in an earlier recipe.  It helps to make a nice crust as the steam of the bread is trapped inside the dutch oven.

I removed the cover for the last bit of baking, until the crust was formed, and the internal temperature was 205 degrees F or so.  This loaf was on temperature at the exact moment I set my timer for, and I brought it out and let it cool.

IMG_2220

Ok, so the moment of truth came and I tried the bread.  It was spicy from the hot pepper flakes, and also, very olive-y.  This loaf was aptly named, but since I do not like the taste of olives, I just didn’t enjoy this bread. Sorry! The texture, though, was great, and it was a good loaf of bread for sure.  The recipe is spot on for spicy olive bread.

IMG_2221

I took the bread into work, and I got a nice reaction.  People found the bread very interesting, and definitely spicy.  One taster commented that it was much too spicy, and rated the bread 2 stars out of 5, just on the spiciness factor — much too spicy for that taster.  Also, I presume the rating was not based upon the skill of the baker. Other tasters were not so judgmental, and gave it 5 out of 5 stars.

IMG_2222

My rating for this loaf is 3 stars — and it is based on flavors only and my own personal taste.  If you love olives, however, and can eat them right out of the bin at the grocery store, and you like that spicy hit at the end, then I think you’d really like this bread.

Thanks for reading, and enjoy the week!  I’ll keep on baking!